6 Player Loopin’ Chewie Hack

As a gamer, maker and designer, I am a huge fan of altering toys and games for more exciting play. Sometimes you just need to make a Nerf dart fly faster or make a toy glow in the dark just for fun.  For those that love action games, Hasbro reintroduced the classic Looping Louie this last year with an epic Star Wars version called Loopin’ Chewie.  Gameplay is simple: Chewbacca flies in circles trying to knock over Stormtrooper tokens.  You defend your tokens by hitting a paddle which can launch the erratic Millennium Falcon away from your troopers and hopefully knock out your opponents.  If you are the last to have Stormtroopers, you win.

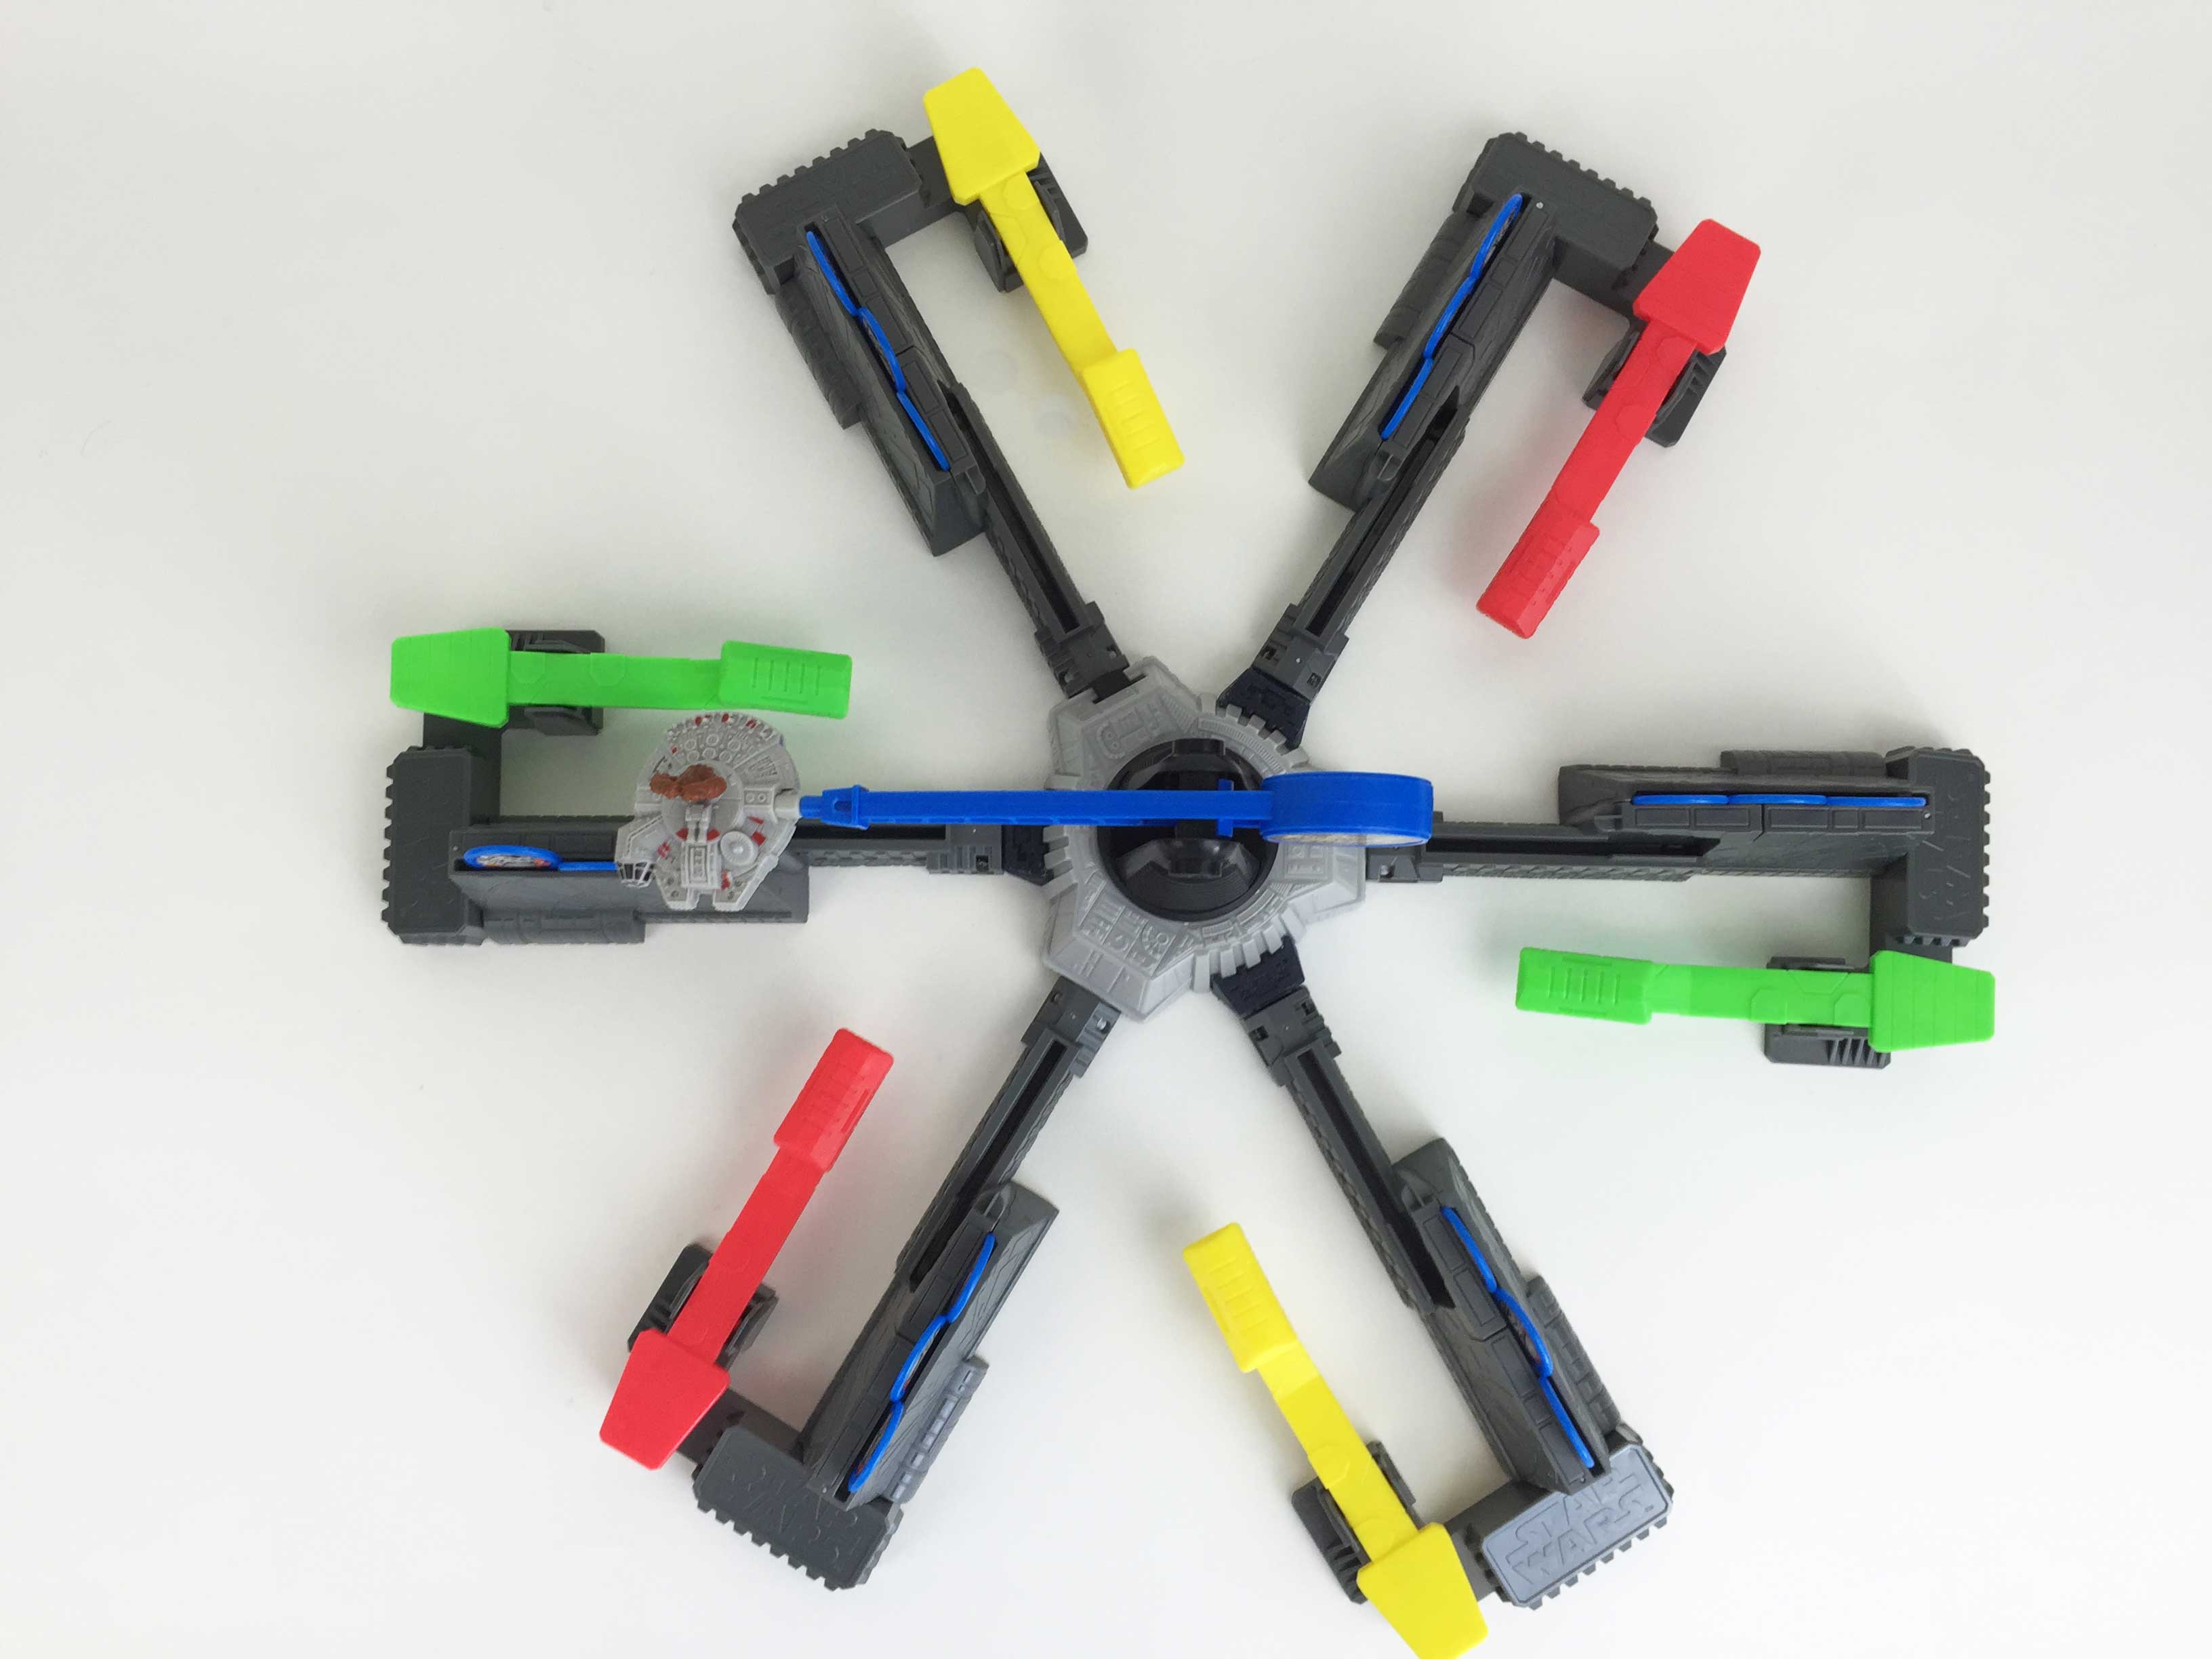
Well, the original Looping Louie was a Loopin' Chewie, Step 1
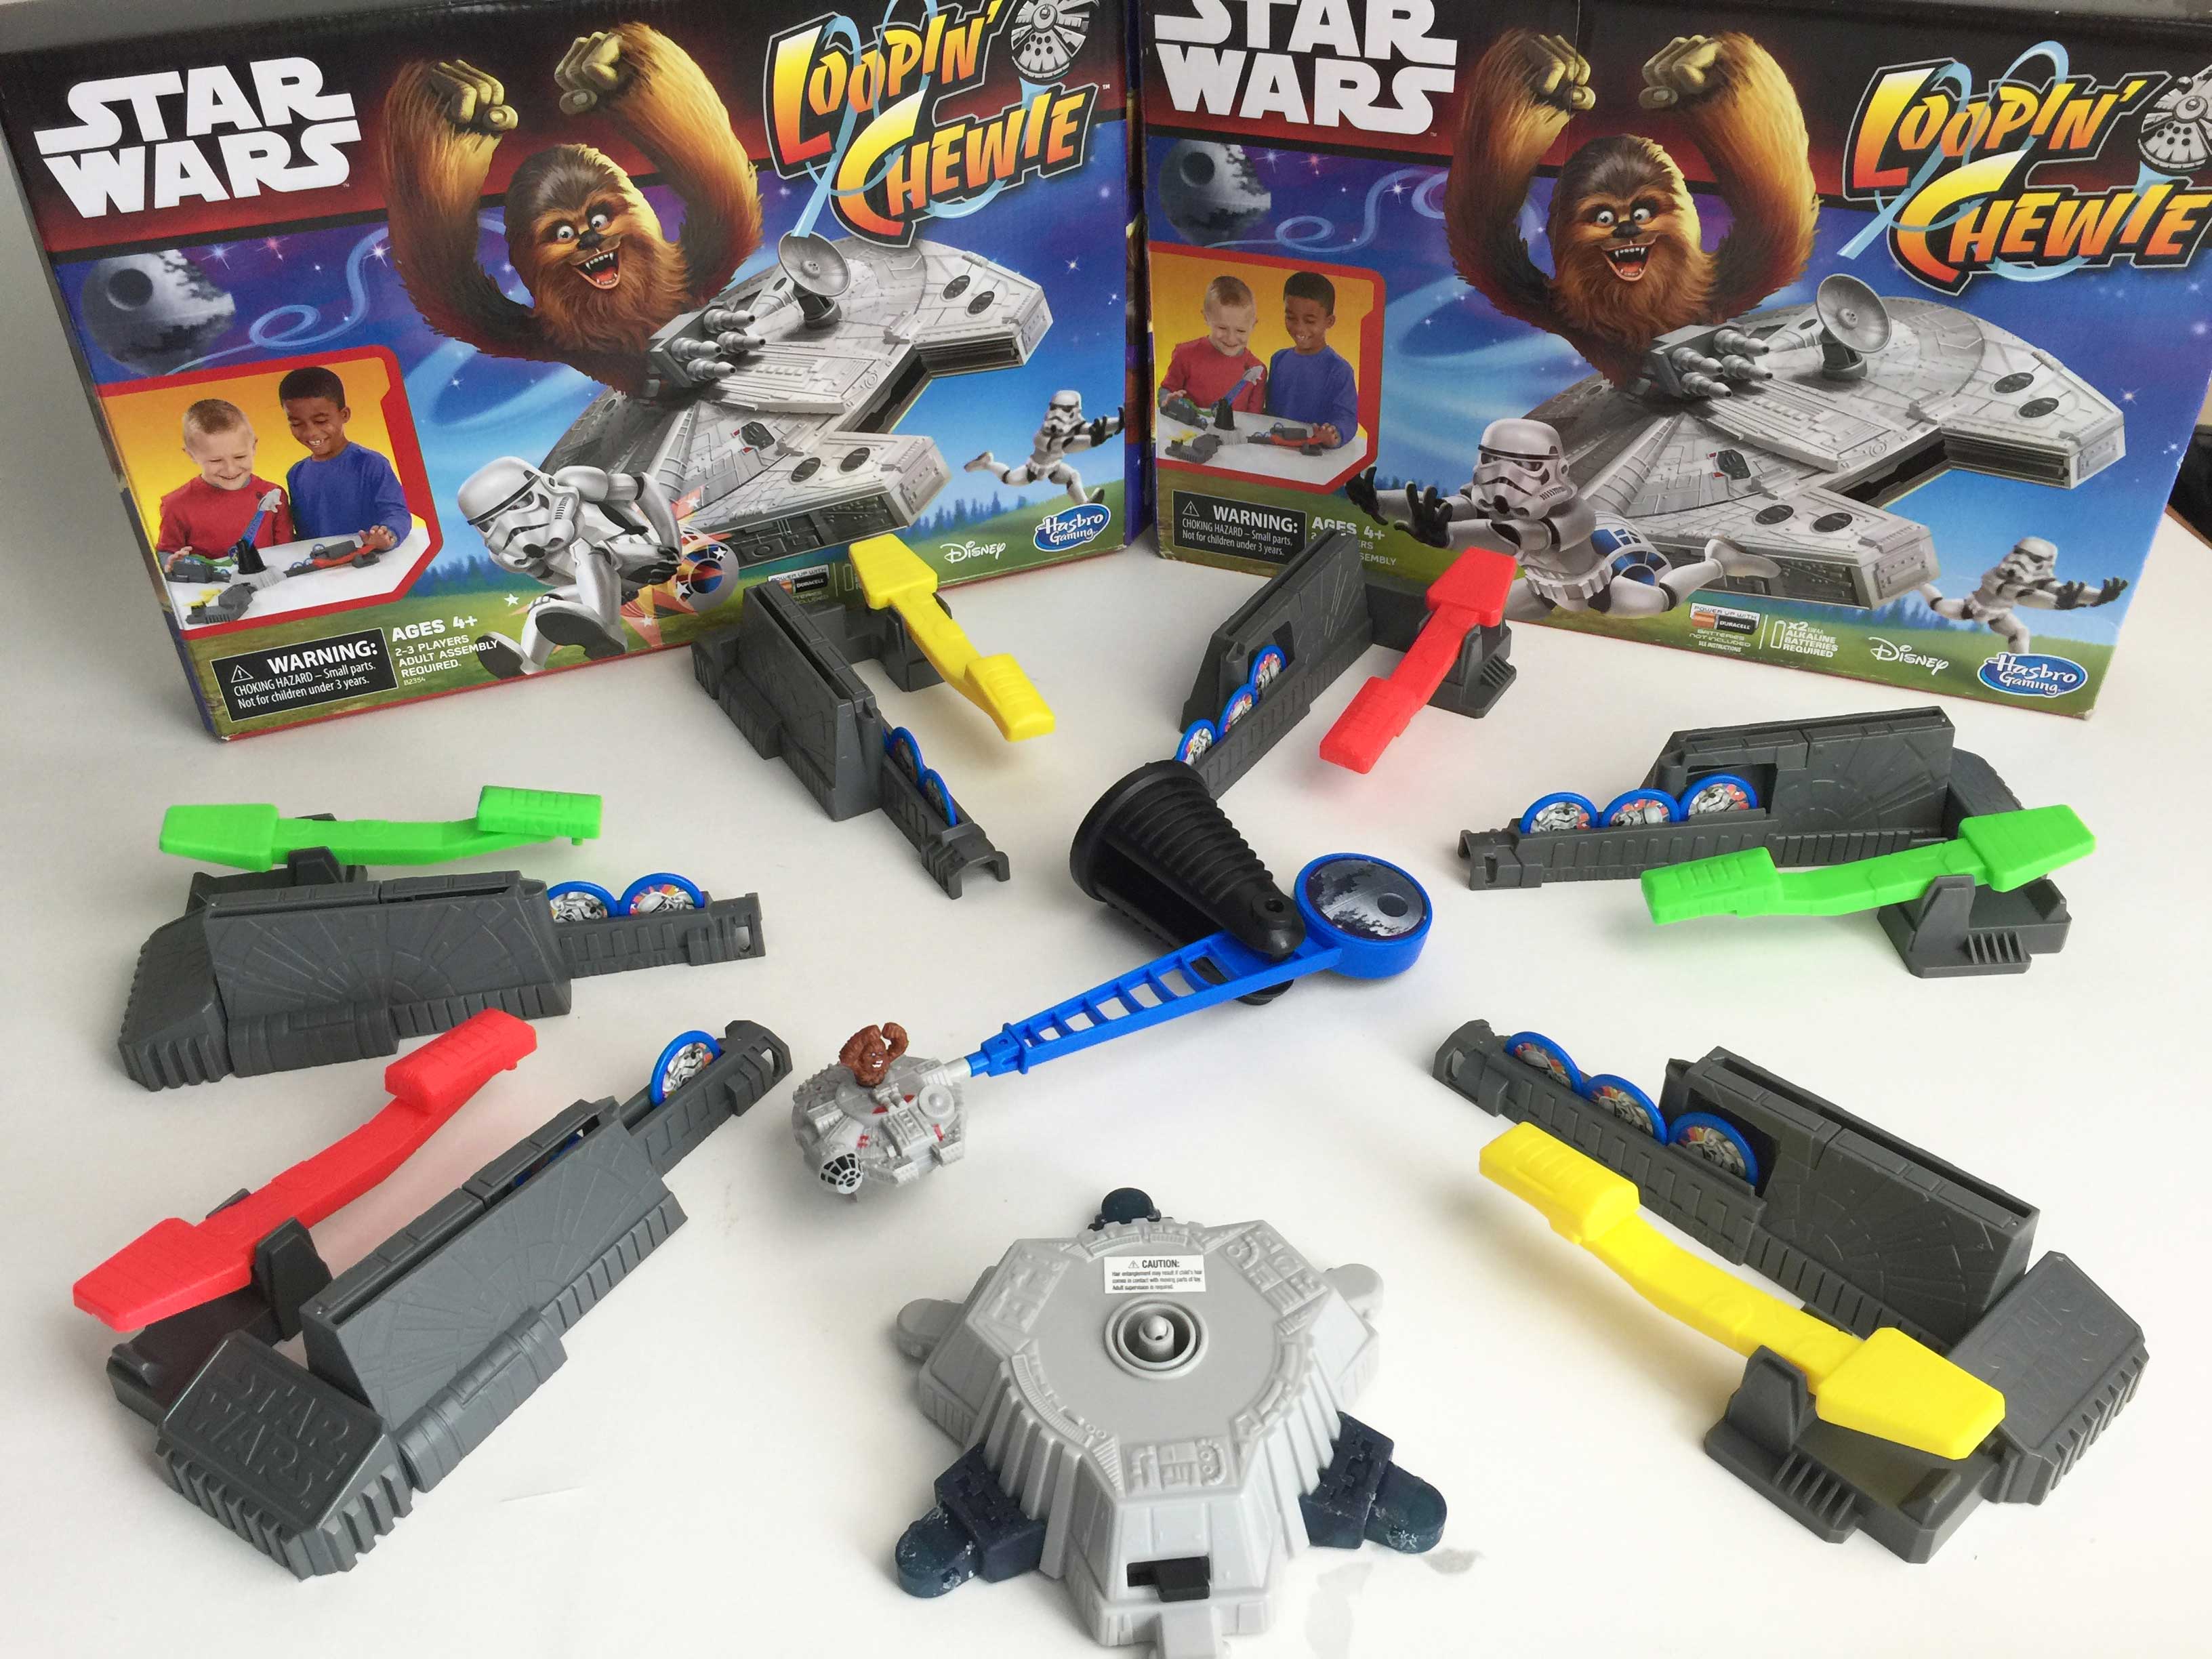
4 player game, and with the reintroduction, the Star Wars edition was dropped to 3 player.  While the game is super fun, I wanted to make play a little more interesting by turning it into a 6 player game.

The necessary 6 Player Loopin’ Chewie Conversion files can be downloaded for 3D print using the Thingiverse.com link below, but here is a step by step if you want to make one yourself…

1. Supplies:

  1. 2 sets of Star Wars Loopin’ Chewie Game,
  2. 3D printer,
  3. Ability to create the 3D file (or download here http://www.thingiverse.com/thing:1798407)

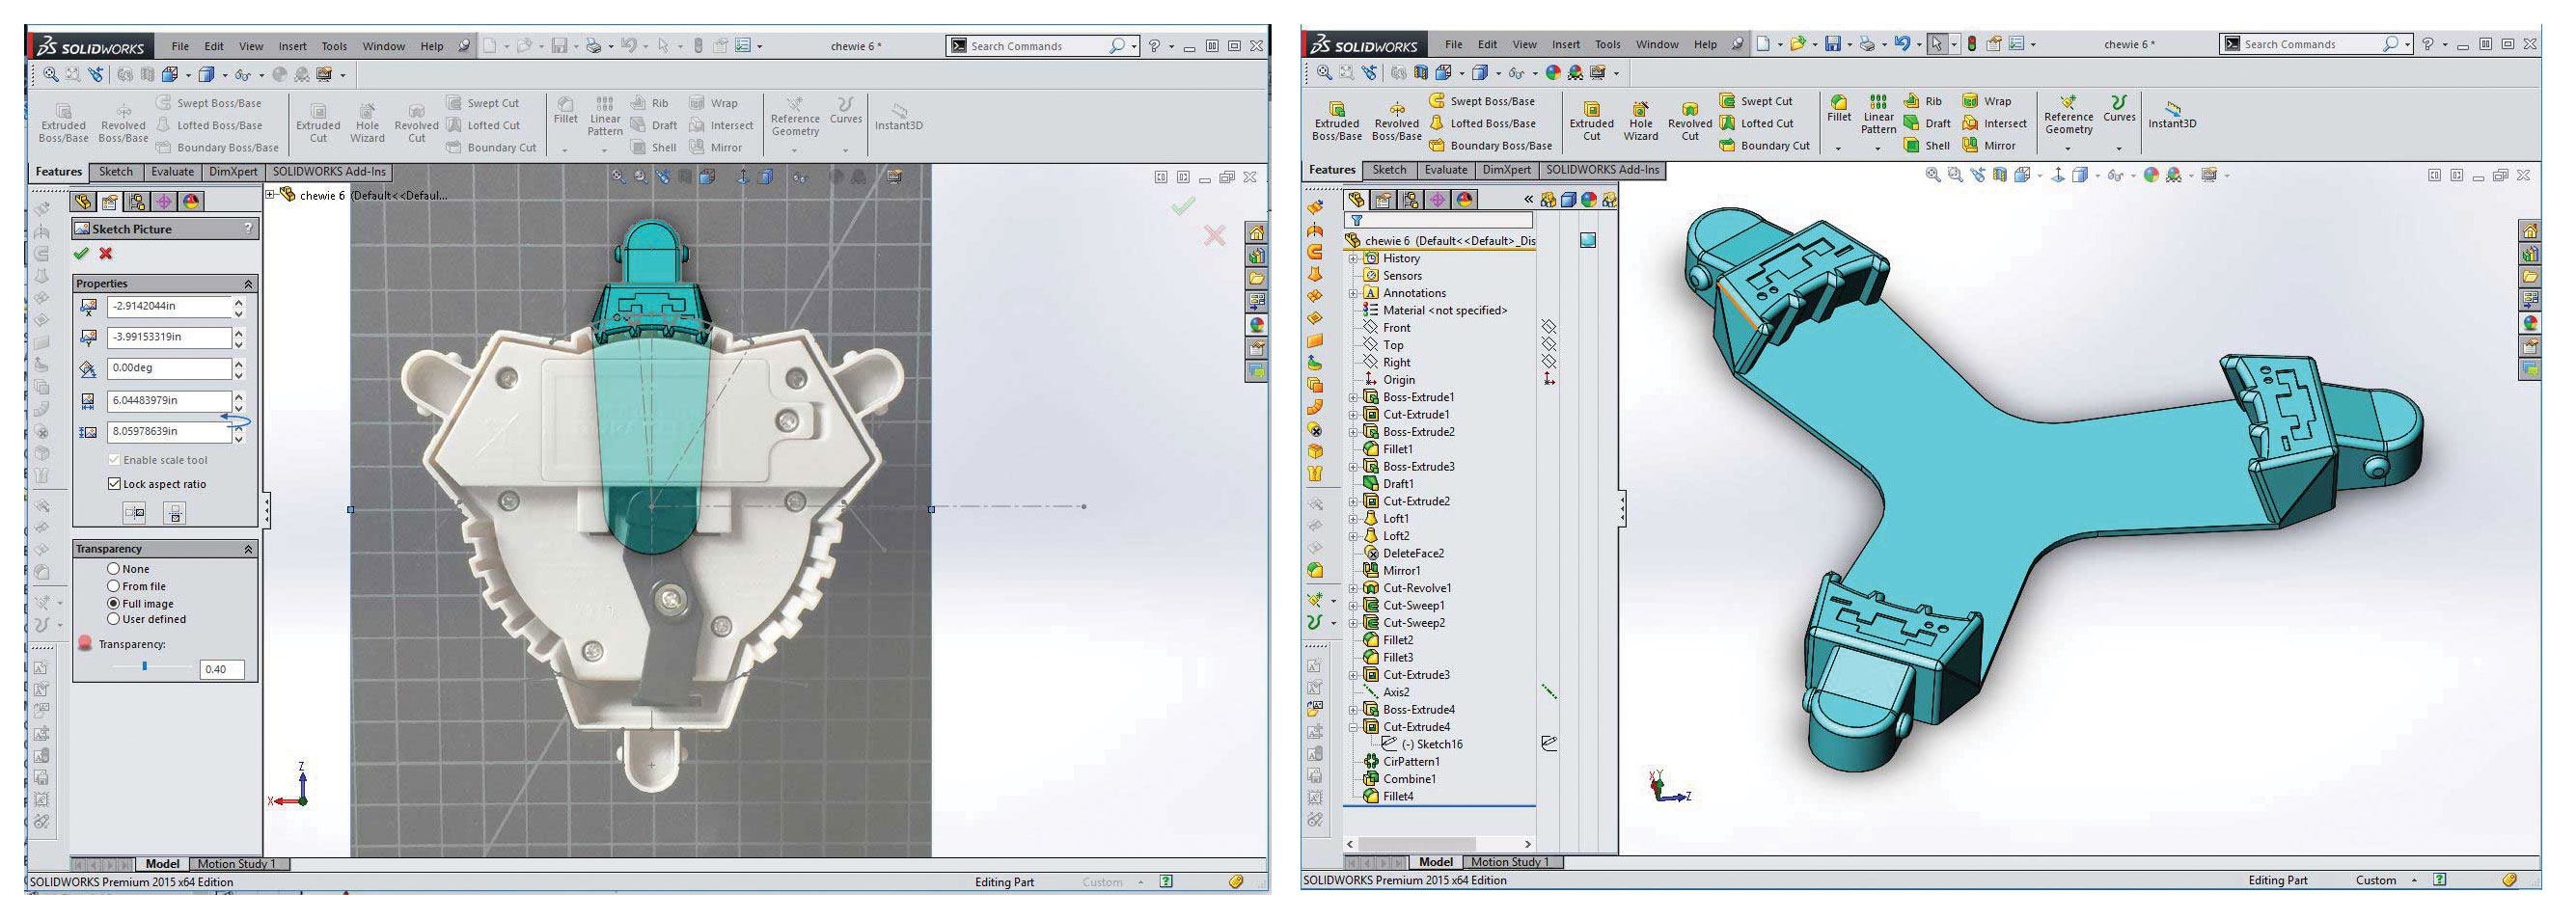
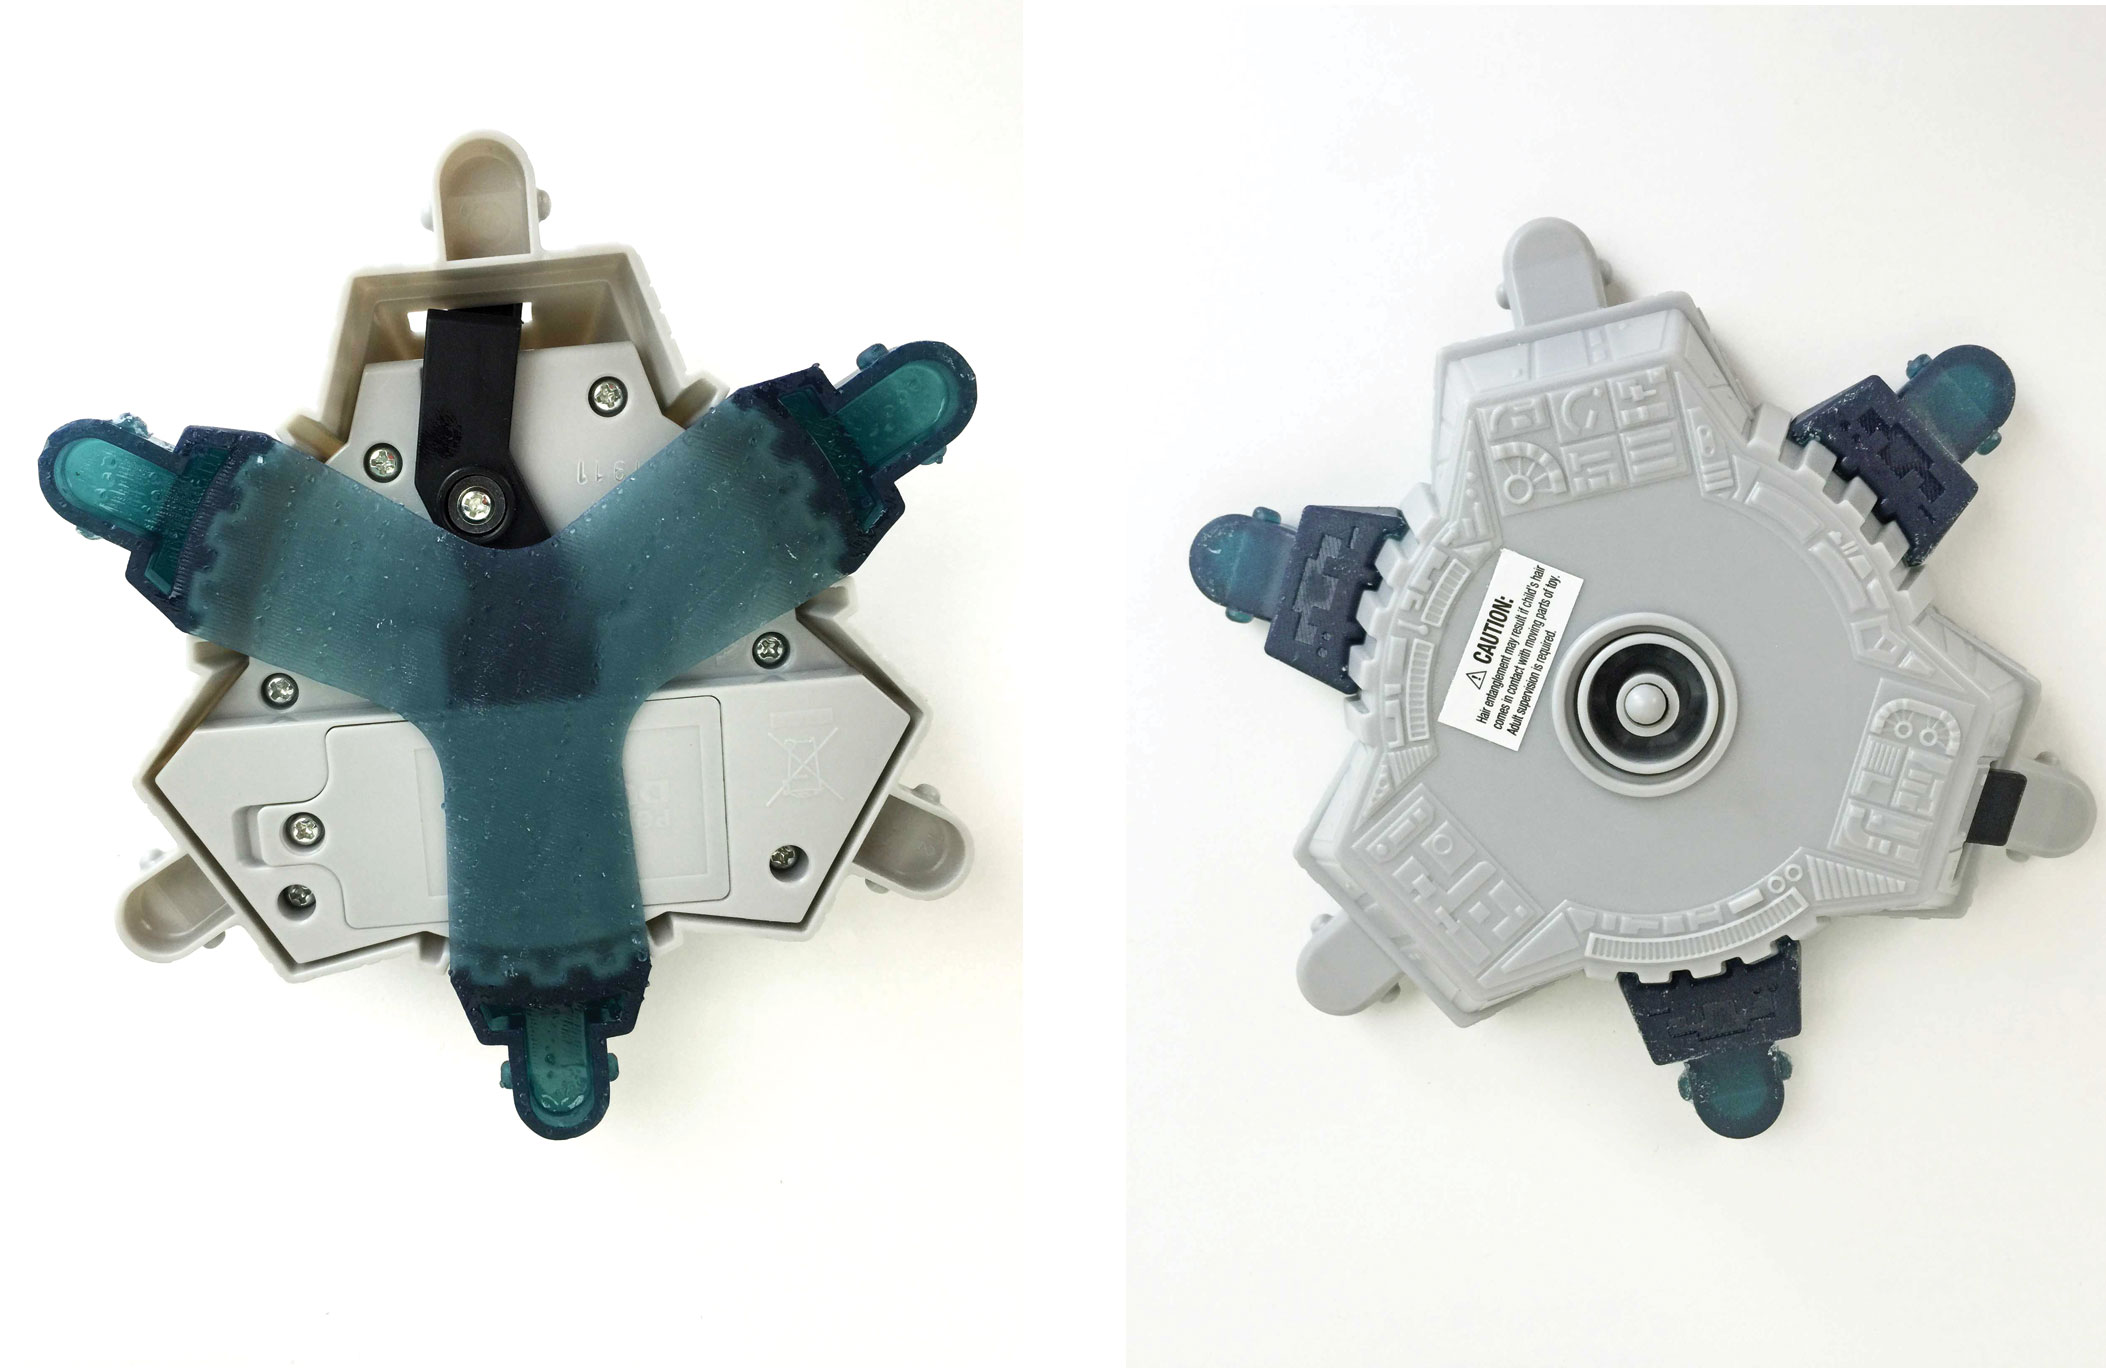
2. Design: Using a photograph of the motorized base as reference geometry, I drew a clip attachment in a 3D CAD software called SolidWorks that would attach to an extra paddle. The base has vertical ridges that come up at an angle, so I was able to use those to help position and hold the part.  I used calipers to measure the features on the original base to make sure my geometry was correct.  With one extra attachment complete, I simply patterned the geometry 3x around the motorized center.

Loopin' Chewie Hack, Step 2

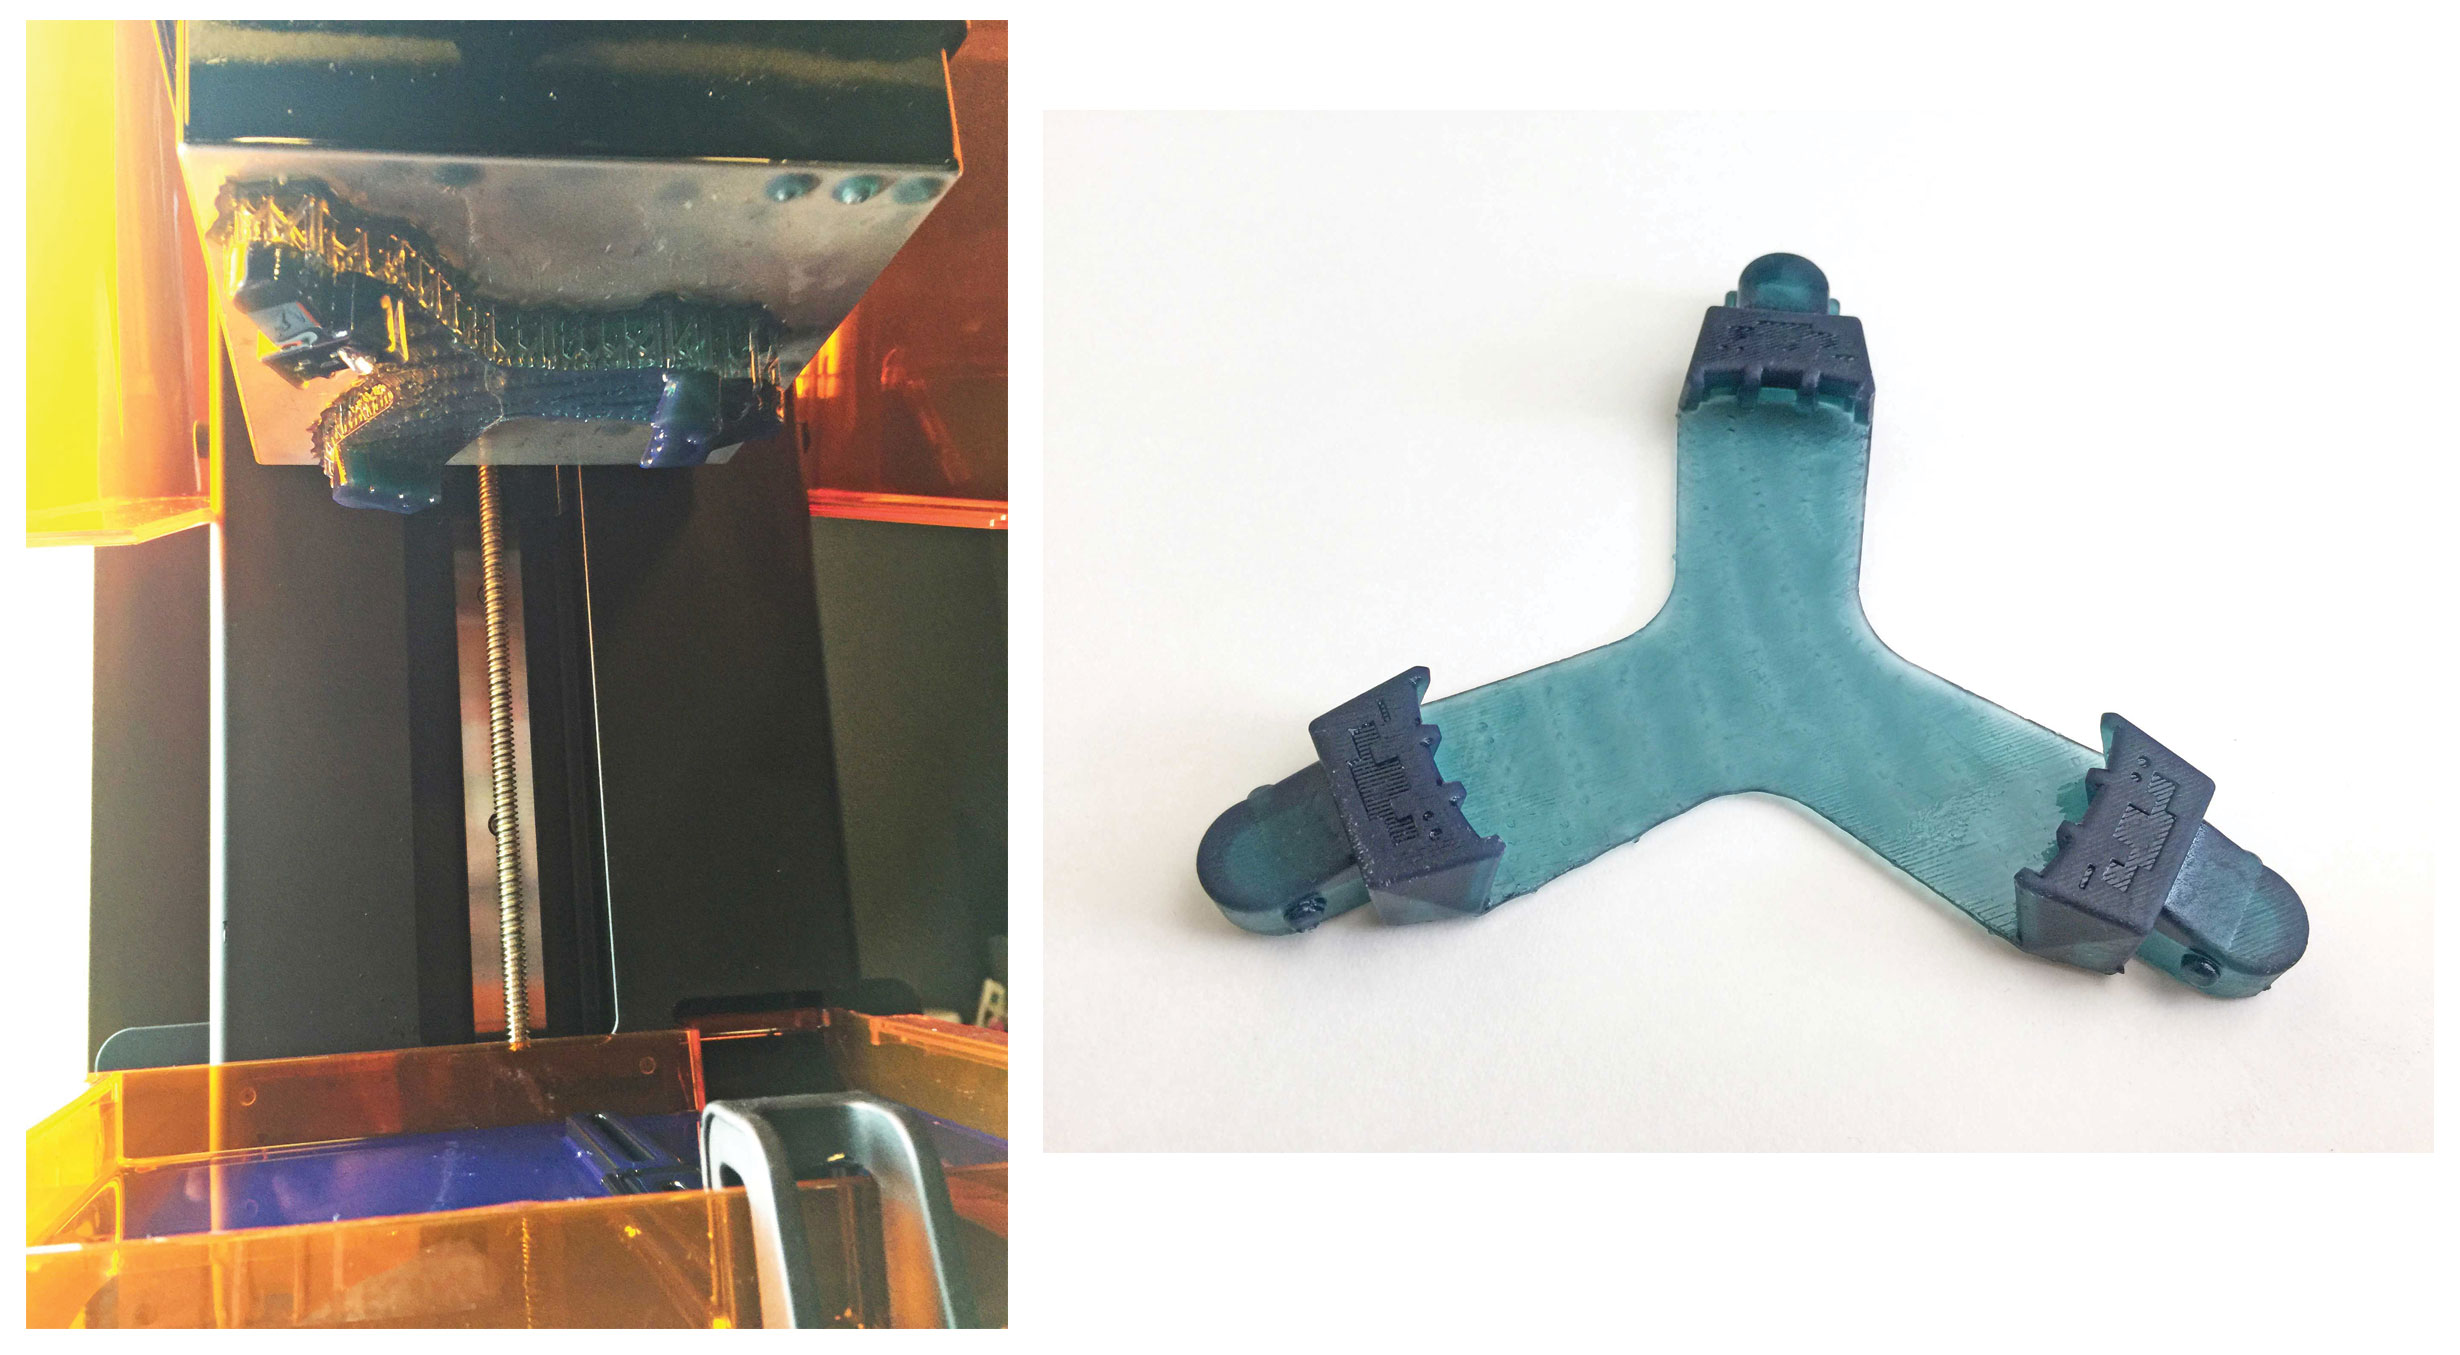
3. 3D Printing: With the 3D file ready, I 3D printed the part on our Formlabs 2 SLA printer out of Tough Resin. This material was ideal since the part has to flex over the base to fit into place… and since it will see proper abuse when things get really competitive. The print took roughly 6 hours and can be seen finished in the machine and with the structural supports removed.

Loopin' Chewie 3D Print - Step 3

4. Assembly: Clip the 6 Player Conversion over the base from
the bottom. Since the print is semi-flexible, it can deform enough to clip over the angled base. The vertical ridges hold it perfectly in place. Attach the 6 paddles. Be careful though – it’s still a 3D print and not as strong as molded plastic. Assemble 6 competitive Star Wars fans, and prepare for battle.

Loopin' Chewie 3D hack - Step 4

5. Play: Get ready, cuz it’s about to get crazy! If you only have 3 players, you can operate a paddle with each hand…. Not easy.

Loopin' Chewie 6 Player hack

Darth Vader & Vacuum Forming

What would be more geek-fun then flash freezing Darth Vader with a metal alloy mixed with tibanna gas?  We thought, not much!  So, that’s what we did… At least Darth Vader Vacuum Form
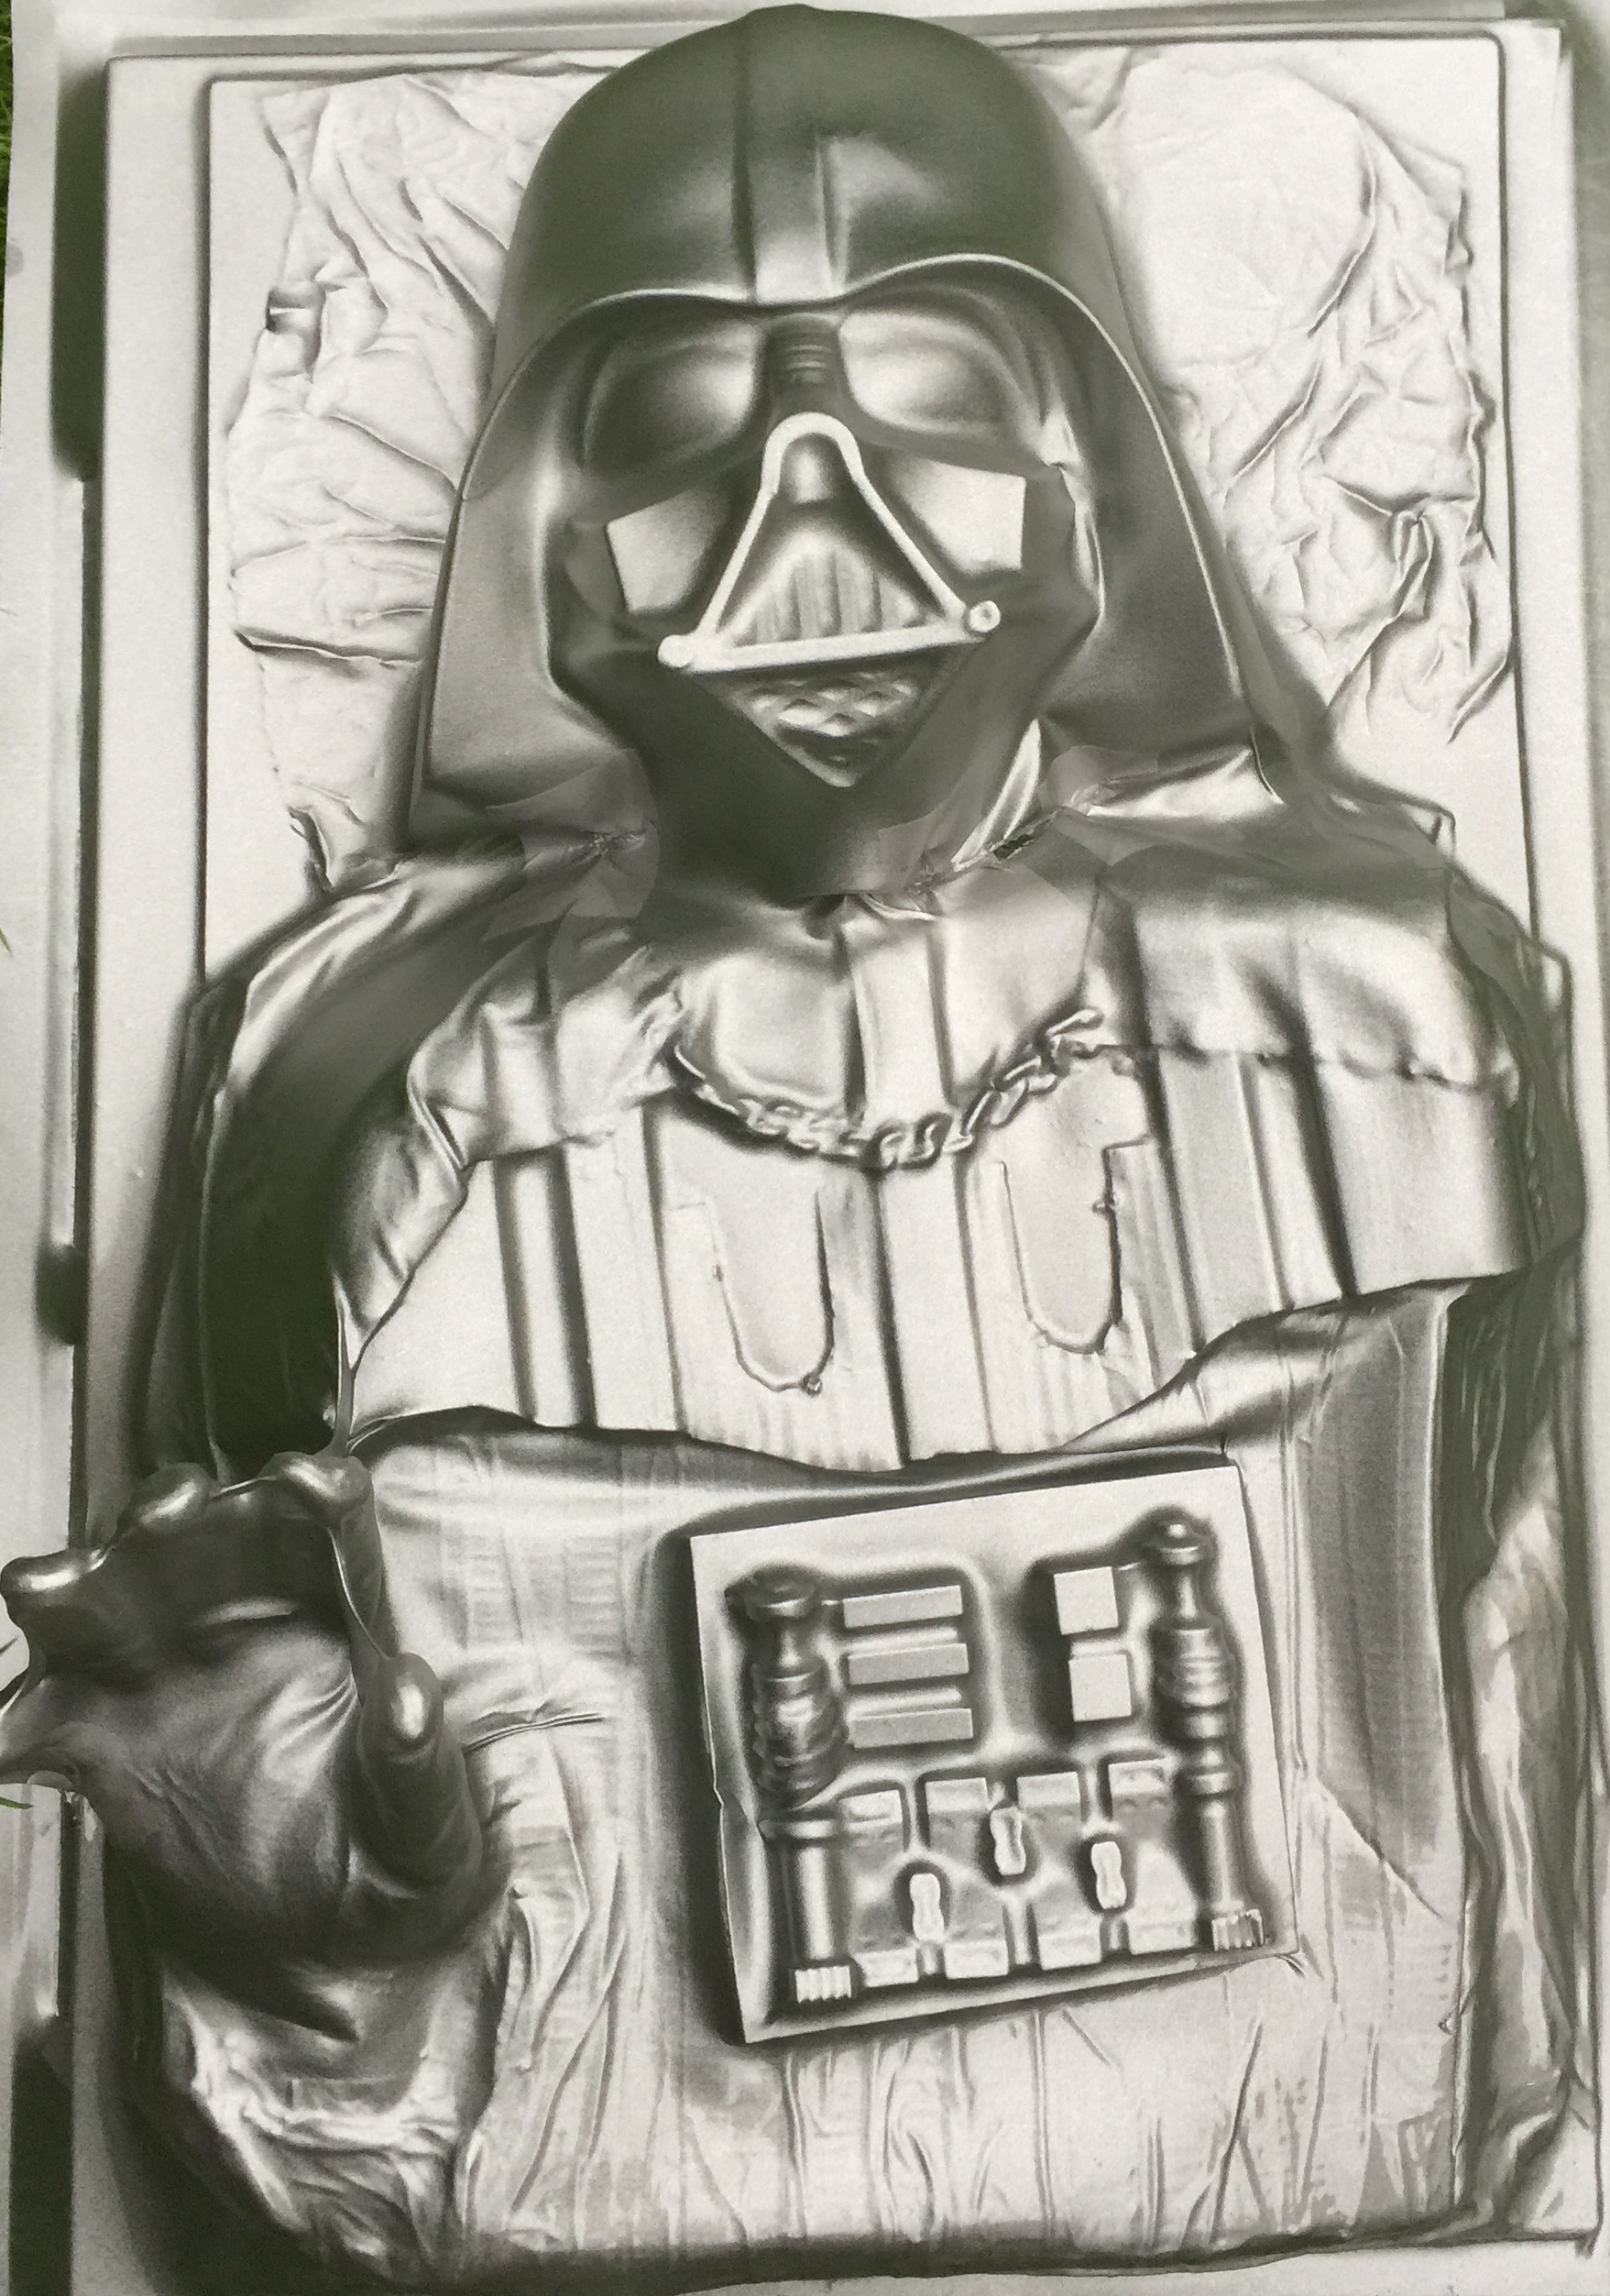
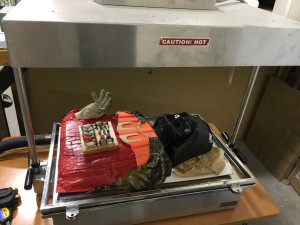
making something that looks like the Sith Lord suspended in Carbonite (See Star Wars – Return of the Jedi).  We used an in-house process called vacuum forming to have a little fun.

Vacuum forming works when you heat up a sheet of plastic in a jig and lower it over a positive form of the shape you want to create. As it lowers onto the mold, a vacuum table (like the reverse of an air hockey table) sucks the air out from under the plastic, forming it around the mold shape. Darth Vader in CarboniteThis is a really handy process for making cases, large panels, and packaging. Typically, we use it for work and paid projects, but when you have the toys, you might as well play every once and a while!

To create the form, we built a Vader look-a-like on a board using a mask, glove, Lego, Maker Studio parts, chain, some fabric, duct tape, a broken sled and some other odds and ends. Once we had the mold, we were able to vacuum form a sheet of plastic over Lord Vader on our vacuum forming machine.  With a little paint touch up, we had Vader suspended in Carbonite-animation.

Enjoy this short video showing the process.

David Yakos is VP and Director of Creativity at Salient Technologies, Inc.

Picking Up A Paintbrush

As a product designer, my DNA is a strange double helix of engineering principles and artistic expression. I perpetually teeter for a good balance between the logical and the lovely. This past year, I came across a wonderful short book written by Winston Churchill called Painting as a Pastime.  For those seeking a little bit of inspiration, it is a quick must-read. Churchill picked up a paintbrush for the first time at the age of 40, and remarked,

“Painting a picture is like trying to fight a battle”.

 This world-leader’s comment was a reflection of the world he knew all too well. He went on to describe painting technique almost as if the battle lines were drawn when the paint was squeezed out of the tube onto the palette.  Prime Minister Churchill – a man who basically ruled the free world for a time – went on to say how painting helped expand his thought processes by exercising parts of his brain that didn’t normally get a workout. I figure, if this practice made such a notable difference for a Nobel Prize-winning leader, surely it would make some kind of transformation in a product designer… Churchill’s curious explanations prompted me to pick up a paintbrush, reflect on the world around me, and commit to painting something new every month.

In taking up this new structured hobby, I have discovered a lot of things for myself. I highly suggest that anyone and everyone give it a try at some point in their life… hopefully sooner, rather than later.  For those in “non-creative fields”, let your creative self out to play. We all have one – some of us simply tried to leave those sides behind as we grew older, thinking it was child’s play.  For those in creative fields, let your artistic expression loose in this non-vocational exercise, giving you the freedom to create without a client waiting on the other end.

Whether you consider yourself artistic or not, you will soon discover there are major benefits that can be developed through painting. Following, are some of the biggest take-aways that emerged for me in this practice.

Paintings by David Yakos

5 personal benefits of painting:

  1. Peace of Mind: I have found that sitting down in front of a blank canvas and covering it with paint has become a retreat for my brain.  There is a freedom in simply creating a picture, and watching it take shape as paint is layered and pushed around a canvas.  Because of this benefit, many groups have employed art for the sake of mental health.
  2. New Eyes: Painting helps me notice fine details that I ignored in the past. It makes me look at faces – not as features with two eyes, a nose and mouth – but as countless facets with resting shades of light.  I now look at water not as a field of blue, but as an oscillating reflection of the world above.  Churchill said of this phenomenon, “A heightened sense of the observation of nature is one of the chief delights that have come to me through trying to paint.”
  3. Appreciation: I find myself watching online videos about the masters like Da Vinci and Rembrandt. I stop and look at art more, and even if I do not love the piece, I consider the amount of effort it must have taken, and ask questions like, “what were they trying to say with this piece?”.  One starts to notice the shifts in time and culture in pondering art.  I’ve tried painting some things I find really difficult, which has given me an even greater appreciation for the Masters.
  4. Growth: The practice of painting is making me a better designer and artist.  As I learn to place color, I dream up products with a deeper understanding of how light will rest on a fresh shape.  My hand-eye dexterity and artistic ability are slowly improving as I come closer and closer to being able to put what I imagine in my minds’ eye down on paper or canvas.
  5. Enjoyment: I find painting to be really, really, really fun! I have been able to make some new friends through the process by painting with others and sharing tips and discoveries with fellow artists.  Painting allows the imagination to run free in a 2D world of color. When all the color is placed where it’s intended, it is a rewarding moment. The monumental task has been accomplished, and you can proudly sign your name on the creation, step back and say, “done”.

It is important to be patient with yourself as you learn.  Have fun! Treat every new work as a learning experience for yourself, allowing for growth, fun, and discovery. If you want to be a more creative engineer, designer or _____________ (fill in the blank), I challenge you to take a moment, and put a little paint on canvas.

David Yakos is President of Streamline Design, and VP and Director of Creativity at Salient Technologies, Inc.

Igniting Budding Engineers & ThinkFun!

Reposted from the SmartPlay blog by ThinkFun President & Co-Founder, Bill Ritchie


Maker Studio Construction Sets: Igniting Budding Engineers

Maker Studio Gears Set

We’ve got some great new ThinkFun products and programs arriving this Spring 2015. I’m proud of them and I want to take the opportunity to describe them to you. The first one I’ll describe is our new Maker Studio Construction Sets.

Our Goals Going In

We usually seek out products that build on our mission to ignite minds and give kids an early advantage. In this case, we wanted to do several things.

  1. Stimulate interest in engineering and creativity
  2. Make a product that was open-ended—not just one-and-done building
  3. Add challenges on top of the builds—ask kids to make their contraption actually accomplish a task

For the Maker Studio sets, we teamed up with two awesome inventors, David Yakos and Parker Thomas; both of them are active in the Maker movement. In fact, on our YouTube Channel, we feature David’s “Pitch Video” to us because the vision was so clear and aligned.

What Is Maker Studio?

Each Maker Studio set consists of a set of parts and instructions for how to build machines using discarded household items like food boxes and plastic bottles. The parts are magical—they are a collection of wheels, gears, axles, connectors, rubber band motor and instructions that show players how to build four machines.. Step 1 is to make household items into moving contraptions. But there’s much more to it. You can create many things with the parts in each set by using different containers and different decorations. The real beauty of Maker Studio is the fact that it has challenges to make your project do something. Push an apple across a table. Lift a soup can from the floor. That’s why we all it Open-Ended.

Made by Bella

Made by Bella – Maker Studio Gears Set – Cable Car Challenge

It Would Have Flopped!

It’s funny… just a few years ago these products would certainly have flopped. How do you explain something that is “open-ended” on a store shelf?

But in a world of YouTube channels and social media, we have a whole new opportunity to present the Maker Studio imagination by showcasing the cool stuff that kids are already making, then inviting our audience to join in themselves and share their own designs and builds.

And to prove our point, we’d like to introduce Bella Yakos and her YouTube Channel, Made By Bella. Bella is the 7 yo daughter of one of the inventors. Take a look at some of Bella’s videos, and you’ll see why we think Maker Studio sets are going to set brains on fire!

This is new territory for us, we’re excited! We are seeing great interest from the Maker movement, STEM and STEAM advocates, and Girls in Engineering programs. It’s the beginning of a whole new category of products for us, products that let the players tell the story.

Here’s hoping that it works! I’ll keep you updated along the way.

If you’re into videos, check out the Made by Bella series – where Bella and her Friends work through the Engineering Challenges of Maker Studio

Made by Bella


You can follow along with Bill and the ThinkFun team HERE!

And click HERE for more about Maker Studio in the News

David Yakos Wins Toy Innovator of the Year!

Congratulations to David Yakos for winning Toy Innovator of the Year at the 9th annual Toy & Game Innovation (TAGIE) Awards

The TAGIE Awards paid tribute to toy and game inventors from around the world whose creative imaginations and playful inventions resulted in today’s most enjoyable play products. At this year’s awards ceremony, excellence was recognized in the categories of Toy Innovator, Game Innovator, Rising Star Innovator, and Digital Toy or Game Innovator. The winners were selected by their industry colleagues and the public. 

TOY INNOVATOR OF THE YEAR Winner: David Yakos, Streamline Design with Lionel Trains for Mega Tracks